Kubernetes notes
- What is Kubernetes?
- Main components
- Architecture
- Minikube and Kubectl set-up
- YAML configuration files for Kubernetes
- Demo
- Namespaces
- Ingress
- Helm Package Manager
What is Kubernetes?
Kubernetes is a container orchestration open source platform that allows you to manage your containers in a cluster. Is developed by Google and is based on their internal platform Borg.
Helps you to manage your containerized applications in different deployment environments.
The need for a container orchestration tool:
- Trend from monolithic to microservices
- Increased usage of containers

Kubernetes offers:
- High availability or no downtime
- Scalability or high performance
- Disaster recovery or backup and restore
- Load balancing or distribute traffic
Important stuff:
- K8s doesn’t manage data persistance, this work should be done by the administrator
Main components
| Component | Definition |
|---|---|
| pod |
|
| service |
|
| ingress |
|
| ConfigMap |
|
| Secret |
|
| Volumes |
|
| Deployment blueprint |
|
| StatefulSet blueprint |
|
- Main components

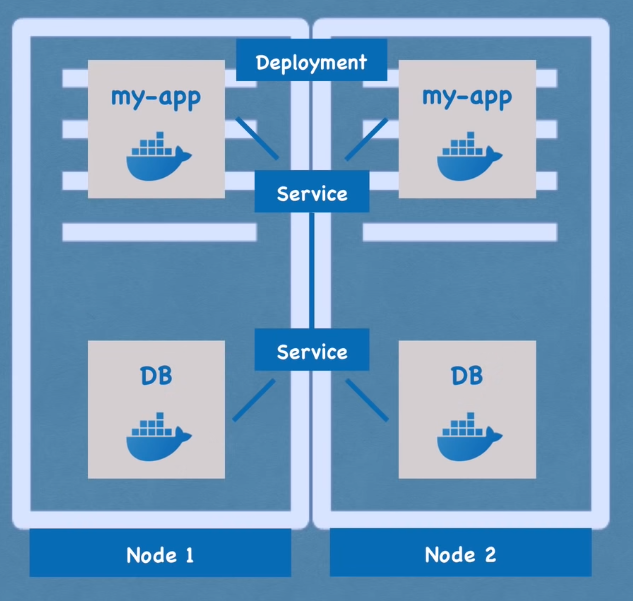
- Deployments
Architecture
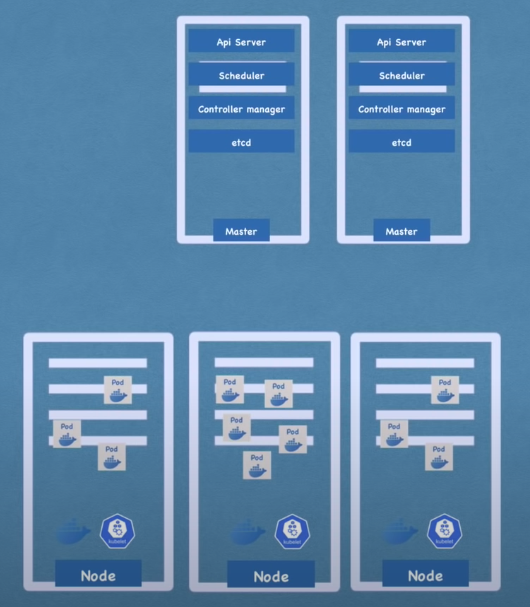
K8s operates in a master-slave architecture. The master node is the brain of the cluster and the slave nodes are the workers.
Worker servers or Nodes
- Each node has multiple Pods on it
- 3 processes are running on each node:
- kubelet: is the agent that runs on each node in the cluster. It makes sure that the containers are running in a Pod. Starts the pod with a container inside
- kube-proxy: is a network proxy that runs on each node in your cluster, implementing part of the Kubernetes Service concept. Forwards traffic to the correct Pod
- container runtime: is the software that is responsible for running containers. K8s supports several container runtimes: Docker, containerd, CRI-O, and any implementation of the Kubernetes CRI (Container Runtime Interface)
- Worker nodes do the actual work
Master Nodes
- Are the responsible for the state management of the cluster and the worker nodes
- Has 4 processes running on every master node
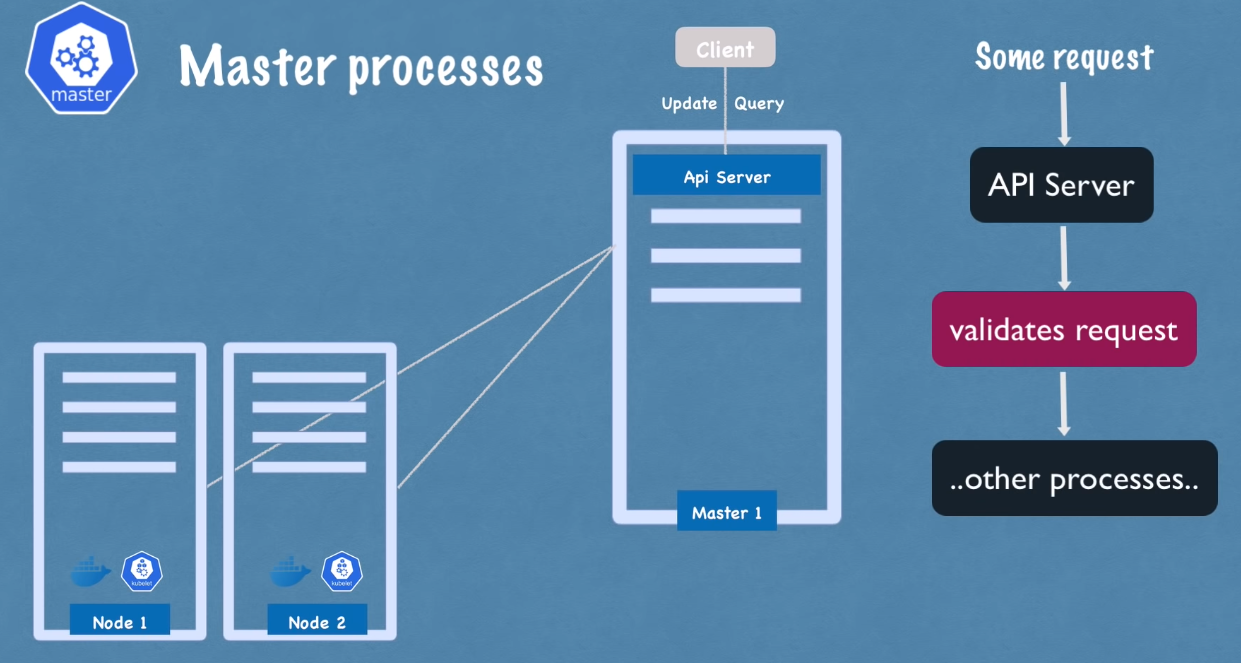
- Api Server: It’s used when a client wants to intereact with the cluster. It’s the only component that interacts with the etcd database. Acts like a cluster gateway and also acts as a gatekeeper for authentication.
- Scheduler: It’s responsible for distributing the creation of Pods across the nodes. The metric to determine where to place the Pod is the current usage of each node.
- Controller manager: It’s responsible for the actual work. It’s a daemon that runs in the background and is responsible for making sure that the actual state of the cluster matches the desired state. It’s responsible for the replication of the Pods, the scaling of the Pods, the rolling updates, etc.
- etcd: Is the cluster brain and is a key/value store. Every change in the cluster get stored in the key value store. The application data isn’t stored in
etcd
Minikube and Kubectl set-up
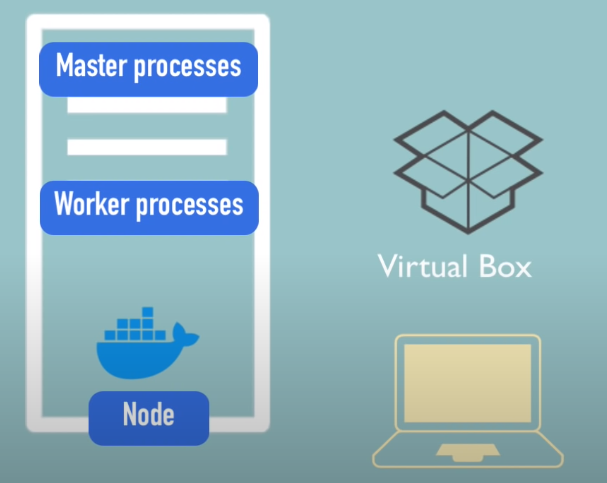
Minikube is a tool that makes it easy to run Kubernetes locally. Minikube runs a single-node Kubernetes cluster inside a VM on your laptop for users looking to try out Kubernetes or develop with it day-to-day.
Runs Master Processes and Worker Processes on a single node.
Kubectl is a command line tool that allows you to run commands against Kubernetes clusters. You can use kubectl to deploy applications, inspect and manage cluster resources, and view logs.
Minikube needs
virtualizationenable and you can check it in linux withegrep -o '(vmx|svm)' /proc/cpuinfoand if you get anvmxorsvmis enabled. On MacOs you can check it withsysctl -a | grep machdep.cpu.features | grep VMX
Also you need to have a
hypervisorinstalled. For example, you can installvirtualbox.
I am going to create a cluster
- Starts the cluster. This command will use the default driver (docker) and will create a container with the name
minikube
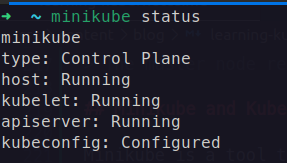
minikube start- You can check the status of minikube running
minikube status
- Get the nodes inside the created cluster
kubectl get nodes- Kubectl CLI is used for configuring the Minikube cluster
- Minikube CLI is used for starting and stopping the Minikube cluster
Main kubeclt commands
- Get the nodes and see their status inside the cluster
kubectl get nodes- Get the pods inside the cluster
kubectl get pods- Get the services inside the cluster
kubectl get services- Create a Pod using Deployments as the abstraction
kubectl create deployment <name> --image=<image-name>- Example with Nginx
kubectl create deployment nginx-depl --image=nginx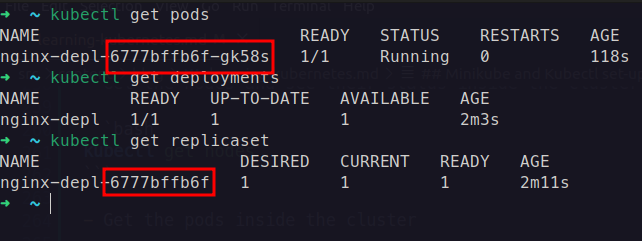
- The name of a Pod is the name of the deployment followed by the replicaset hash and the Pod hash
- namedeployment-[replicaset hash]-[pod hash]
- Replicaset is managing the replicas of a Pod

- Edit a deployment
kubectl edit deployment <name>- Debugging a Pod
kubectl logs <pod-name> # to see logs
kubectl describe pod <pod-name> # to describe the pod- Interacting with a Pod
kubectl exec -it <pod-name> -- bin/bash- Delete deployments
kubectl delete deployment <deployment-name>- Using a config file to create a deployment
kubectl apply -f <config-file>- Example with Nginx
kubectl apply -f nginx-deployment.yamlapiVersion: apps/v1
kind: Deployment
metadata:
name: nginx-deployment
labels:
app: nginx
spec: # specification of the deployment
replicas: 3 # number of replicas
selector: # select the pods that are going to be managed by this deployment
matchLabels:
app: nginx
template: # template of the pods
metadata:
labels:
app: nginx
spec: # specification of the pod
containers:
- name: nginx
image: nginx:1.16
ports:
- containerPort: 80- Delete with a config file
kubectl delete -f <config-file>- To get the information of the cluster (readed from the kube-public namespace)
kubectl cluster-infoYAML configuration files for Kubernetes
Each configuration file consist of 3 parts:
- metadata: Specifies the name of the object and labels
- labels: Any key value pair that can be used to identify the object
- specification: Specifies the desired state of the object. And its attributes are specific to the
kindof object- selectors:
matchLabelsis used to select the Pods that are going to be managed by this deployment.
- selectors:
- status: Is Auto-generated and added by kubernetes. It makes sure that the desired and actual state of the object matches and continuously updates the status of the object. K8s knows the actual state by the
etcddatabase which is the brain of the cluster
etcdholds the current status of any K8s component
- In a
deployment kind, insidespecwe can see thetemplatefield that allows us to specify the configuration of a Pod - To connect a service to a deployment we must specify inside the
selectorfield the key value that was specified in the mainmetadata/labelfield of the deployment file
Example:
nginx-deployment.yaml
apiVersion: apps/v1
kind: Deployment
metadata:
  name: nginx-deployment
  labels:
    app: nginx # the same as the selector of the service
spec:
  replicas: 2
  selector:
    matchLabels:
      app: nginx # the same as the label of the deployment
  template:
    metadata:
      labels:
        app: nginx # the same as the selector of the service
    spec:
      containers:
      - name: nginx
        image: nginx:1.16
        ports:
        - containerPort: 8080 # the same as the targetPort of the service
nginx-service.yaml
apiVersion: v1
kind: Service
metadata:
  name: nginx-service
spec:
  selector:
    app: nginx # the same as the label of the deployment
  ports:
    - protocol: TCP
      port: 80
      targetPort: 8080 # the same as the containerPort of the deployment
Demo
Introduction
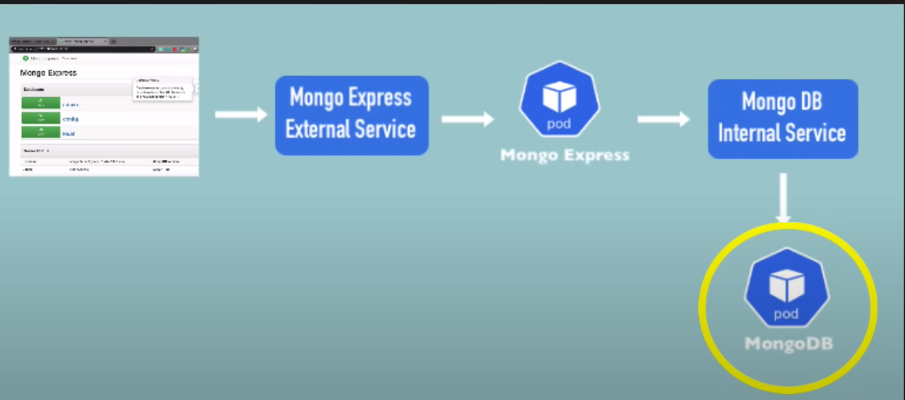
We asked to create a simple mongo-express GUI client using docker and kubernetes. The mongo-express GUI client will be deployed on a kubernetes cluster.

Requirements
Keep in mind that you need to have installed docker and kubernetes on your machine. Also you may need to have a basic knowledge of yaml files.
Development
I will be using minikube to create a local kubernetes cluster, so make sure you have it installed on your machine. If you don’t, you can follow the instructions here.
- Create a
mongodbdeployment
vim mongodb-deployment.yamlapiVersion: apps/v1
kind: Deployment
metadata:
name: mongodb-deployment
labels:
app: mongodb
spec:
replicas: 1
selector:
matchLabels:
app: mongodb
template:
metadata:
labels:
app: mongodb
spec:
containers:
- name: mongodb
image: mongo
ports:
- containerPort: 27017
env:
- name: MONGO_INITDB_ROOT_USERNAME
valueFrom:
secretKeyRef:
name: mongodb-secret
key: mongo-root-username
- name: MONGO_INITDB_ROOT_PASSWORD
valueFrom:
secretKeyRef:
name: mongodb-secret
key: mongo-root-passwordNote that in orden to read the env variables, we need to create first the secrete for mongodb.
- Creation of
secretfor mongodb
vim mongodb-secret.yamlapiVersion: v1s
kind: Secret
metadata:
name: mongodb-secret
type: Opaque
data:
mongo-root-username: dXNlcm5hbWU= # base64 encoded `username`
mongo-root-password: cGFzc3dvcmQ= # base64 encoded `password`- Run these commands in order to create the
deploymentandsecretfor mongodb
kubectl apply -f mongodb-secret.yaml
kubectl apply -f mongodb-deployment.yaml- Create an
internal servicefor mongodb
We can write the configuration in the same file as deployment, because they are related.
vim mongodb-deployment.yaml# add these lines at the end of the file
---
apiVersion: v1
kind: Service
metadata:
name: mongodb-service
spec:
selector:
app: mongodb
ports:
- protocol: TCP
port: 27017
targetPort: 27017Run the following command to create the service
kubectl apply -f mongodb-deployment.yaml- Creation of
mongo-expressdeployment
vim mongo-express-deployment.yamlapiVersion: apps/v1
kind: Deployment
metadata:
name: mongo-express
labels:
app: mongo-express
spec:
replica: 1
selector:
matchLabels:
app: mongo-express
template:
metadata:
labels:
app: mongo-express
spec:
containers:
- name: mongo-express
image: mongo-express
ports:
- containerPort: 8081
env:
- name: ME_CONFIG_MONGODB_ADMINUSERNAME
valueFrom:
secretKeyRef:
name: mongodb-secret
key: mongo-root-username
- name: ME_CONFIG_MONGODB_ADMINPASSWORD
valueFrom:
secretKeyRef:
name: mongodb-secret
key: mongo-root-password
- name: ME_CONFIG_MONGODB_SERVER
valueFrom:
configMapKeyRef:
name: mongodb-configmap
key: database_url- Create a
configmapfor mongo-express
vim mongodb-configmap.yamlapiVersion: v1
kind: ConfigMap
metadata:
name: mongodb-configmap
data:
database_url: mongodb-serviceRun the following command to create the configmap
kubectl apply -f mongodb-configmap.yaml
kubectl apply -f mongo-express-deployment.yaml- Create an
external servicefor mongo-express
Add the following lines at the end of the mongo-express-deployment.yaml file
---
apiVersion: v1
kind: Service

metadata:
  name: mongo-express-service
spec:
  selector:
    app: mongo-express
  type: LoadBalancer # This line is useful to make the service externally accessible
  ports:
    - protocol: TCP
      port: 8081
      targetPort: 8081
      nodePort: 30000 # Port for external access. Between 30000 and 32767
Run the following command to create the service
kubectl apply -f mongo-express-deployment.yamlTo assign an external IP address to the service, you need to run the following command:
minikube service mongo-express-service. This is because we are usingminikubeto create a local kubernetes cluster.
- Check the status of the pods
kubectl get pods -o wide- Check the status of mongo-express accessing to the external IP address generated. You can see this IP with
minikube service mongo-express-service --urlNamespaces
Is a virtual cluster inside a kubernetes cluster and provides a way to organize clusters resources.
Kubernetes gives us 4 namespaces by default and out of the box:
- kube-system: Is the namespace for objects created by the Kubernetes system. It contains pods and services that are required for the cluster to function properly, such as the Kubernetes API server itself, the scheduler, and the core resource controllers. You don’t create objects in this namespace.
- kube-public: Contains a ConfigMap of the public information about the cluster. This namespace is readable by all users, including those not authenticated. This namespace is mostly used by cluster administrators to share resources with all users of the cluster.
- kube-node-lease: Holds information about the heartbeats of the nodes in the cluster. Each node has associated lease object in this namespace. Also this namespace helps to determine the aviablity of a node.
- default: Is the namespace where you will create the resources by default if you don’t create a namespace explicitly.
To create a namespace from the command line:
kubectl create namespace <namespace-name>To create a namespace from a config file:
apiVersion: v1
kind: Namespace

metadata:
  name: <namespace-name>
kubectl apply -f <config-file>Here is an example of how to organize the resources in different namespaces:
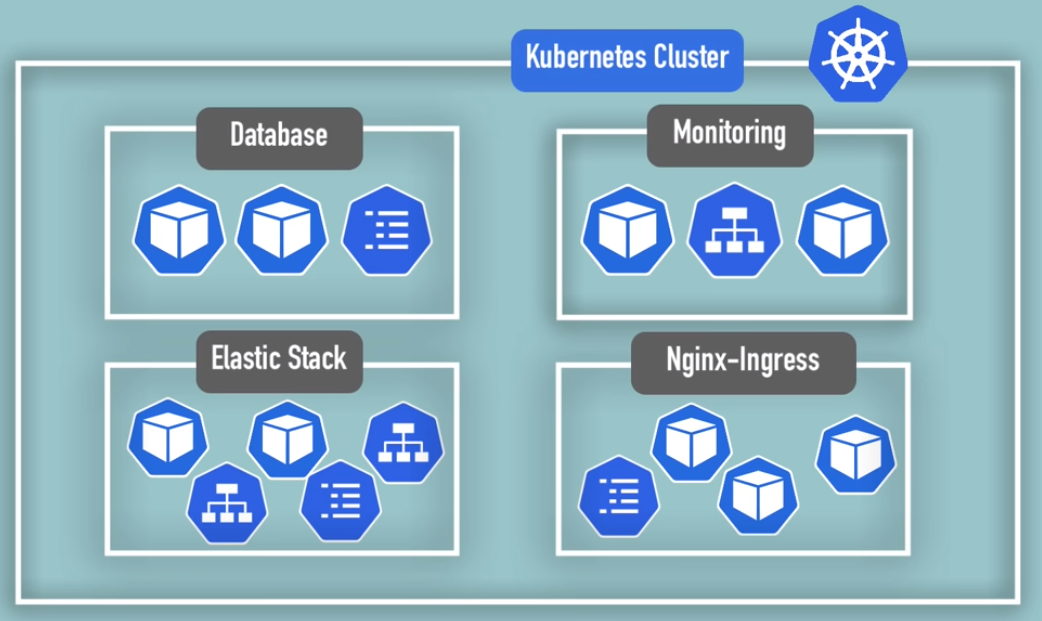
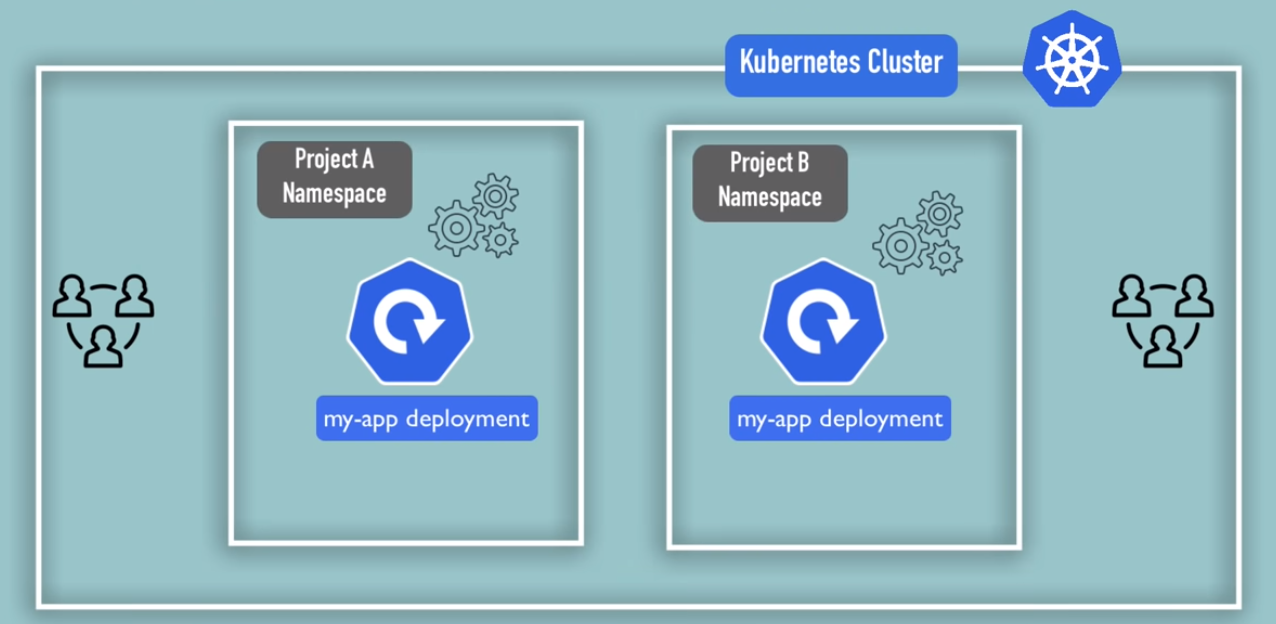
Also, you may have different teams working in a same named deployment but with different configuration, so you can create a namespace for each team and create a deployment for each team.
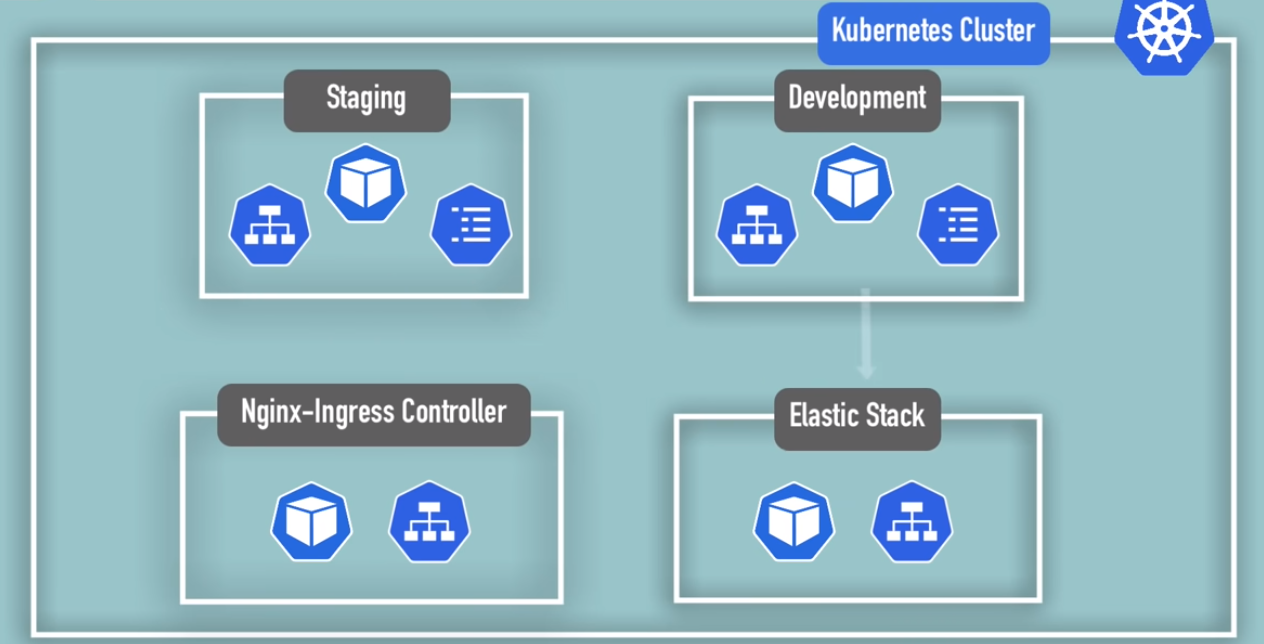
Also, you may want to share resources within different environments, so you can create a namespace for each environment and create a deployment for each environment.
Characteristics
- You can’t access most resources from another Namespace. Each NS must define own ConfigMaps and Secrets.
- You can access services from another Namespace by using the following syntax:
service-name.namespace-name - Some components can’t be created inside a namespace. For example, you can’t create a
volumeor anodeinside a namespace.- You can check all the components that can’t be created inside a namespace running the following command:
kubectl api-resources --namespaced=false - You can check all the components that can be created inside a namespace running the following command:
kubectl api-resources --namespaced=true
- You can check all the components that can’t be created inside a namespace running the following command:
To create components inside a namespace using a config file we can use the following syntax:
- Using a command
kubectl apply -f <config-file> -n <namespace-name>- Configuring it inside the config file
# ...
metadata:
  name: <component-name>
  namespace: <namespace-name>
# ...- To get the any resource inside a namespace
kubectl get <resource-name> -n <namespace-name>Ingress
Is a component which is useful to redirect traffic for a certain domain to a certain service inside the cluster. The service must be of type Internal and the IP and PORT shouldn’t be exposed to the outside world.
In an ingress configuration file we can specify the following:
# ...
spec:
  rules:
  - host: myapp.com
    http:
      paths:
      - backend:
        serviceName: myapp-internal-service
        servicePort: 8080
# ...
Additionally to this configuration to create the ingress, we must create an Ingress Controller. This component has the following responsibilities:
- Evaluates all the rules in your cluster
- Manages all the redirections
- Entrypoint to the cluster
- There is many third-party implementations of ingress controllers. You can choose the
Nginx Ingress Controllerwhich is the default used by K8
Practice using Minikube
To enable ingress in minikube, we must run the following command:
minikube addons enable ingress- This command will automatically starts the K8s NGINX implementation of the ingress controller
Let’s create an ingress rule using a config file:
- First activate the dashboard
minikube dashboard- Now, let’s create the actual ingress rule
vim dashboard-ingress.yamlapiVersion: networking.k8s.io/v1
kind: Ingress
metadata:
name: dashboard-ingress
namespace: kubernetes-dashboard
spec:
rules:
- host: dashboard.com
http:
paths:
- backend:
service:
serviceName: kubernetes-dashboard
servicePort: 80kubectl apply -f dashboard-ingress.yaml- Now, we must add the following line to the
/etc/hostsfile
sudo vim /etc/hosts# ...
x.x.x.x dashboard.com
# ...- Now, we can access to the dashboard using the following url:
dashboard.com
Use cases
- You may want to redirect traffic from a certain path to a certain service. For example, you may want to redirect traffic from
myapp.com/apito a certain service inside the cluster.

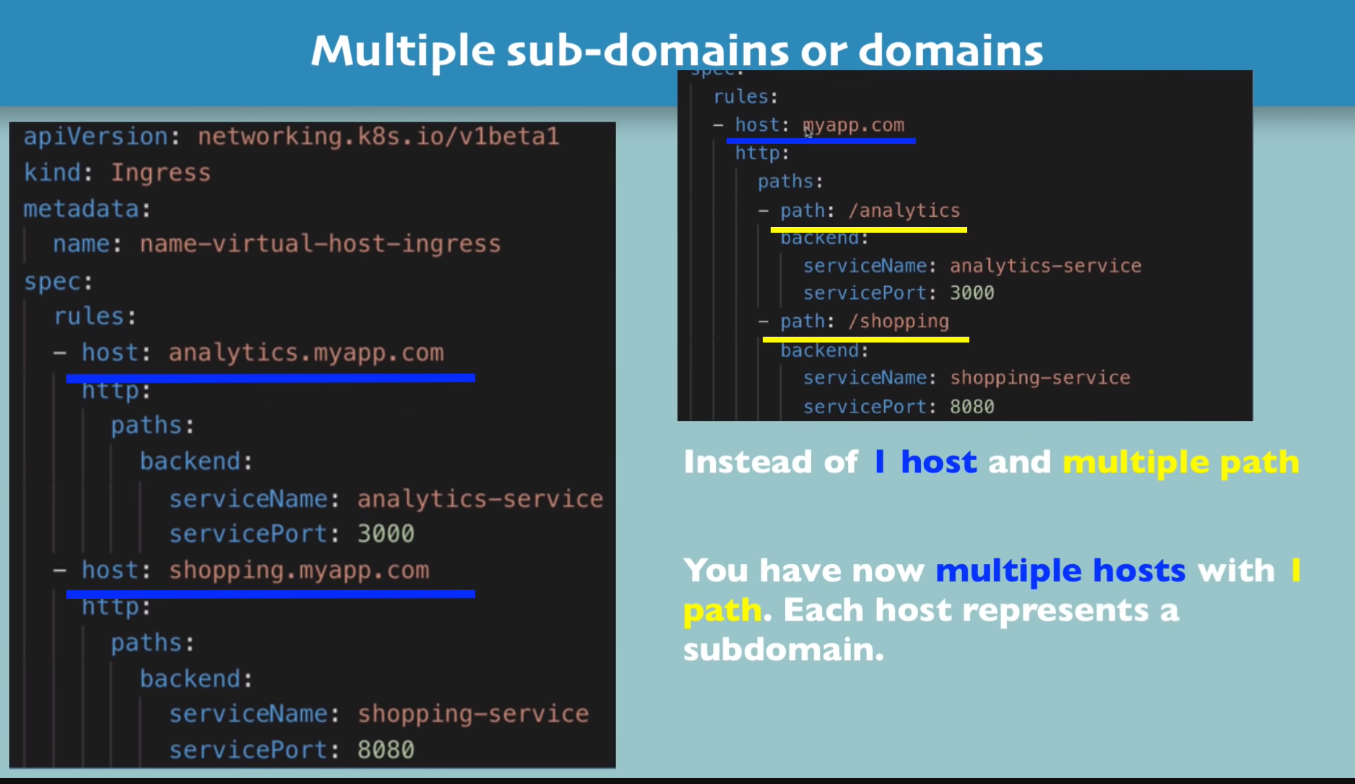
- You may want to redirect traffic from a certain subdomain to a certain service. For example, you may want to redirect traffic from
api.myapp.comto a certain service inside the cluster.
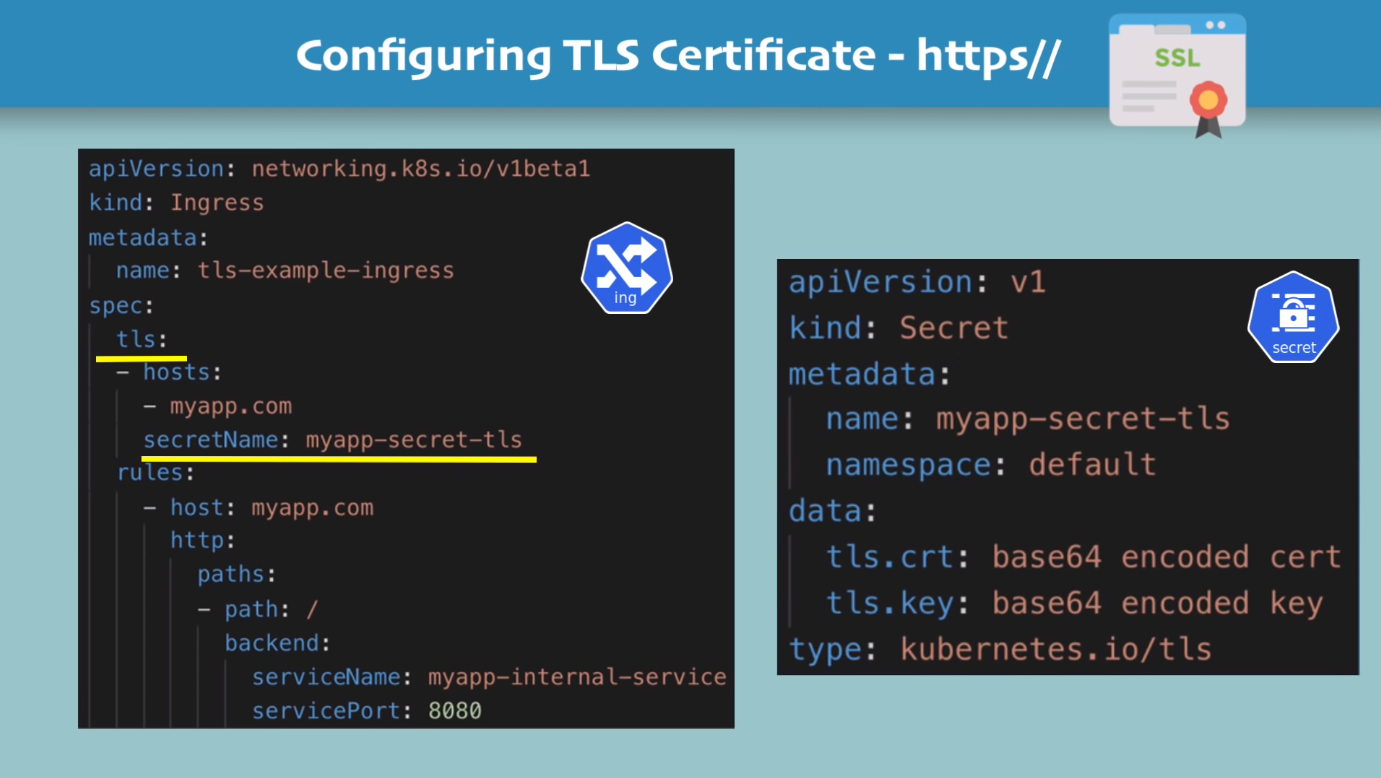
Configure TLS certificate
